IAM
Icebreaker runs entirely inside your EKS cluster. Its own AWS IAM footprint is two surfaces — the IAM role shared by the Data Server and per-query executor pods (for S3 access and the optional node cost monitor), and the ECR pull access for the Icebreaker container images. Both are covered on this page. Related components (your Iceberg catalog, Karpenter) own their own IAM; the table below points at where to set those up.
The Icebreaker Agent itself requires no AWS IAM permissions — it uses Kubernetes RBAC only (created by the Helm chart).
Components at a glance
Section titled “Components at a glance”| Component | AWS IAM / auth needed | Your action | EKS Auto Mode | Reference |
|---|---|---|---|---|
| Icebreaker Agent | None — Kubernetes RBAC only | None; Helm chart creates the ServiceAccount and RBAC | — | — |
colibri ServiceAccount (Data Server + query executor pods) | IAM role: S3 source read, results write, optional cost monitor | Create the role and wire it via EKS Pod Identity (recommended) or IRSA | Pod Identity Agent pre-installed; you still create the role and the association | Query workload IAM role |
| Node cost monitor | ec2:DescribeSpotPriceHistory on the colibri role | Add the optional statement to the colibri policy, or disable with rbac.monitorNodeCosts: false | Same as above | Node cost monitor |
| ECR image pull | ECR pull on your EKS node role | Icebreaker contact grants cross-account access; you confirm the node role includes ECR pull | Node role includes ECR pull automatically | ECR image pull access |
| Lakekeeper (if used as catalog) | IAM role for the Lakekeeper SA: S3 metadata read/write | IAM and Helm steps are bundled in the deploy guide | Same as colibri SA above | Evaluate Icebreaker with Lakekeeper |
| Karpenter | IAM role for EC2 provisioning | Configured as part of Karpenter installation — separate from Icebreaker | Built in to EKS Auto Mode — no action needed | Karpenter docs |
Query workload IAM role
Section titled “Query workload IAM role”The Data Server Deployment and the per-query executor pods it dispatches both run under the colibri Kubernetes ServiceAccount in the eyrie-compute namespace. A single AWS IAM role bound to that ServiceAccount covers both:
- Executor pods to read source data from S3 and write Parquet results.
- The Data Server used when the node cost monitor is enabled (
ec2:DescribeSpotPriceHistory).
You attach the role to the ServiceAccount via EKS Pod Identity (the newer, recommended approach; pre-installed on EKS Auto Mode clusters), or IAM Roles for Service Accounts (IRSA).
Suggested role name: icebreaker-query-workload. You can use any name; this guide refers to the role by this name throughout.
The setup has four steps:
- Create the IAM role (with a Pod Identity or IRSA trust policy).
- Create the IAM policies.
- Attach the policies to the role.
- Bind the role to the
colibriServiceAccount.
Create the IAM role
Section titled “Create the IAM role”Create the role with the trust policy that matches your chosen attachment method. Leave permissions empty for now — you’ll attach policies in step 3.
AWS Console click-path: IAM → Roles → Create role → choose a trusted entity (see options below) → Next → skip the permissions step (Next without selecting any) → name the role icebreaker-query-workload → Create role. See AWS’s Creating IAM roles for a full walkthrough.
Use one of the following:
Pod Identity trust policy (recommended)
In the Create role wizard, set Trusted entity type → AWS service and Use case → EKS. A radio list of EKS use cases will appear below — pick EKS - Pod Identity. AWS populates the correct trust policy automatically.
Prerequisite: the EKS Pod Identity Agent must be installed on your cluster. It is pre-installed on EKS Auto Mode; otherwise see Amazon EKS Pod Identities for the agent install.
IRSA trust policy
In the Create role wizard, set Trusted entity type → Web identity and select your EKS cluster’s OIDC provider with audience
sts.amazonaws.com. After the wizard, edit the trust policy to scope thesubcondition to:system:serviceaccount:eyrie-compute:colibriSee IAM roles for service accounts for the trust policy template and OIDC provider setup.
Create IAM policies
Section titled “Create IAM policies”You’ll create two required IAM policies (icebreaker-source-read, icebreaker-results-write) plus an optional one (icebreaker-cost-monitor). The recommended setup uses two separate S3 buckets — one for source data (read-only) and one for query results (read-write) — so each policy targets a distinct bucket with the minimum necessary permissions.
AWS Console click-path: IAM → Policies → Create policy → JSON tab → paste the JSON → Next → name it (matching the title above the JSON block) and paste the suggested description → Create policy. Repeat for each block. See AWS’s Creating IAM policies for a full walkthrough.
Source read (required)
Section titled “Source read (required)”Replace <your-source-bucket> with the name of the S3 bucket containing your Iceberg source data.
Suggested description: Grants Icebreaker query executor pods read access to the S3 bucket containing Iceberg source data
{ "Version": "2012-10-17", "Statement": [ { "Sid": "IcebreakerSourceDataRead", "Effect": "Allow", "Action": [ "s3:GetObject", "s3:ListBucket", "s3:GetBucketLocation" ], "Resource": [ "arn:aws:s3:::<your-source-bucket>", "arn:aws:s3:::<your-source-bucket>/*" ] } ]}Query results write (required)
Section titled “Query results write (required)”Replace <your-results-bucket> with the name of your dedicated results bucket.
Suggested description: Grants Icebreaker query executor pods read and write access to the S3 bucket used for query output
{ "Version": "2012-10-17", "Statement": [ { "Sid": "IcebreakerResultsWrite", "Effect": "Allow", "Action": [ "s3:GetObject", "s3:PutObject", "s3:DeleteObject", "s3:ListBucket", "s3:GetBucketLocation", "s3:ListBucketMultipartUploads", "s3:AbortMultipartUpload", "s3:ListMultipartUploadParts" ], "Resource": [ "arn:aws:s3:::<your-results-bucket>", "arn:aws:s3:::<your-results-bucket>/*" ] } ]}Node cost monitor (optional)
Section titled “Node cost monitor (optional)”If you set rbac.monitorNodeCosts: false in your Helm values, omit this policy. The monitor logs warnings and stays idle; queries are unaffected.
Suggested description: Grants the Icebreaker Data Server access to EC2 Spot pricing for per-query node cost monitoring
{ "Version": "2012-10-17", "Statement": [ { "Sid": "IcebreakerNodeCostMonitor", "Effect": "Allow", "Action": [ "ec2:DescribeSpotPriceHistory" ], "Resource": "*" } ]}Attach the policies to the role
Section titled “Attach the policies to the role”In the IAM console: Roles → icebreaker-query-workload → Permissions → Add permissions → Attach policies. Select the policies you created in the previous step (icebreaker-source-read, icebreaker-results-write, and optionally icebreaker-cost-monitor) and click Add permissions.
Bind the role to the colibri ServiceAccount
Section titled “Bind the role to the colibri ServiceAccount”The colibri ServiceAccount is created by the Helm chart during Agent install. You can create the binding now or later:
- Pod Identity: AWS accepts a Pod Identity association targeting a ServiceAccount that doesn’t exist yet — it stays dormant and activates once the Agent install creates the SA. Complete this step now.
- IRSA: The binding is the Agent’s
helm installcommand (see below). Note the role ARN now and bring it to the Install the Agent step.
Use the binding mechanism that matches the trust policy you chose when creating the role.
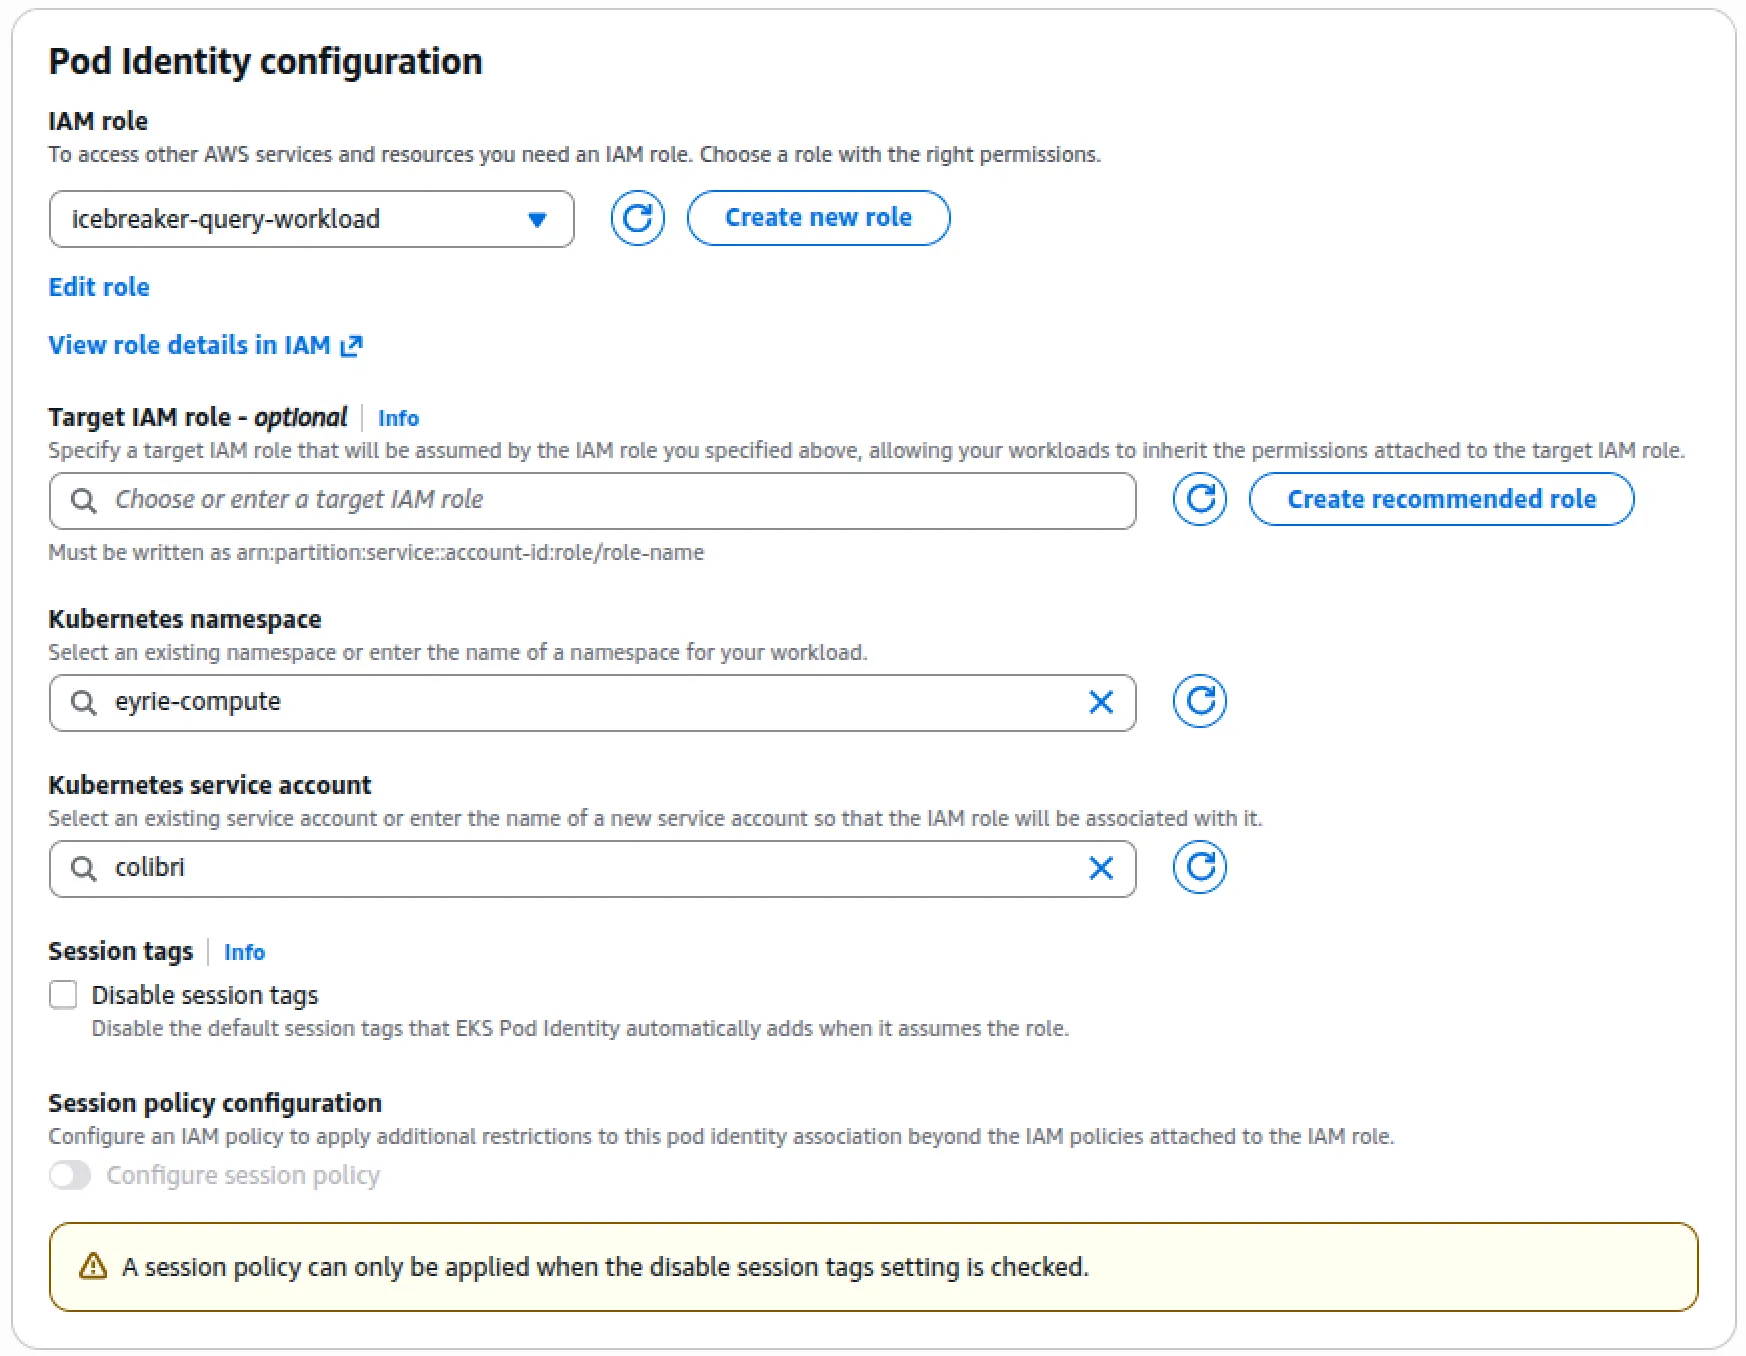
Via EKS Pod Identity association (recommended)
Follow Create a Pod Identity association in the AWS docs, using these Icebreaker-specific values:
- IAM role:
icebreaker-query-workload - Kubernetes Namespace:
eyrie-compute(or your custom workload namespace for your EKS cluster) - Kubernetes Service account:
colibri
- IAM role:
Via Helm chart annotation (IRSA)
There is no separate binding step for IRSA — the Helm chart creates the
colibriSA and annotates it with the IAM role ARN during Agent install. When you reach Install the Agent, add the role ARN to yourhelm installcommand viaagent.workloadServiceAccountAnnotations.CLI form:
bash helm install icebreaker-agent icebreaker/eyrie-agent \--namespace eyrie-compute \--set agent.existingSecret=icebreaker-agent-token \--set agent.workloadServiceAccountAnnotations."eks\.amazonaws\.com/role-arn"=arn:aws:iam::<account-id>:role/icebreaker-query-workload \# ... other valuesOr in a values file:
yaml agent:workloadServiceAccountAnnotations:eks.amazonaws.com/role-arn: arn:aws:iam::<account-id>:role/icebreaker-query-workload
ECR image pull access
Section titled “ECR image pull access”Icebreaker provides container images for the Icebreaker Agent and Data Server from a private ECR registry. Your EKS nodes need permission to pull from it.
Your Icebreaker contact will provide, during onboarding:
- The ECR registry ARN(s) — paste these into the
Resourcefield of the policy below - Confirmation that your AWS account ID has been granted pull access on the Icebreaker-side registry
Create the IAM policy
Section titled “Create the IAM policy”AWS Console click-path:
IAM → Policies → Create policy → JSON tab → paste the JSON below → Next → name it
icebreaker-ecr-pulland paste the suggested description → Create policy.
See AWS’s Creating IAM policies for a full walkthrough.
Suggested description: Grants EKS nodes permission to pull Icebreaker container images from the Icebreaker cross-account ECR registry
{ "Version": "2012-10-17", "Statement": [ { "Sid": "ECRAuth", "Effect": "Allow", "Action": "ecr:GetAuthorizationToken", "Resource": "*" }, { "Sid": "ECRPull", "Effect": "Allow", "Action": [ "ecr:GetDownloadUrlForLayer", "ecr:BatchGetImage", "ecr:BatchCheckLayerAvailability" ], "Resource": [ "<provided_during_onboarding>" ] } ]}ecr:GetAuthorizationToken requires Resource: "*" — AWS does not support resource-scoped authorization for this action. The pull actions are resource-scoped to Icebreaker’s specific repository ARNs.
Attach the policy to the node IAM role
Section titled “Attach the policy to the node IAM role”Your node IAM role was set up with your cluster. The default for EKS Auto Mode is AmazonEKSAutoNodeRole.
To attach the policy to the node IAM role, follow this AWS Console click-path:
IAM → Roles → click
AmazonEKSAutoNodeRole→ Permissions tab → Add permissions → Attach policies → search foricebreaker-ecr-pull→ Add permissions.
If you need to find the EKS node IAM role, follow this AWS Console click-path:
EKS → Clusters → your cluster → Compute tab → Node Configuration → EKS Node classes Node IAM role. The role name appears as a clickable link.