Set up an EKS Auto Mode cluster
EKS Auto Mode is the recommended cluster configuration for Icebreaker. Karpenter and the AWS Load Balancer Controller are integrated into the Auto Mode control plane.
1. Create the cluster
Section titled “1. Create the cluster”Use the AWS Console or cli to create an Elastic Kubernetes Service cluster. For background information, refer to AWS’s Get started with Amazon EKS – EKS Auto Mode.
For an Icebreaker evaluation, we recommend these settings:
Kubernetes version: 1.29 or later.
Quick configuration (with EKS Auto Mode)
VPC: the default VPC is fine for evaluation. For production, use a custom VPC with private subnets and a NAT gateway for egress.
Cluster IAM role and node IAM role: use AWS’s “Create new role” buttons in the wizard. They attach the Auto Mode-specific policies automatically. Note the node role name (default
AmazonEKSAutoNodeRole) — you’ll attach theicebreaker-ecr-pullpolicy to it later.VPC: select or create a VPC
Subnets: select all available subnets in your chosen VPC, covering at least two availability zones. If you plan to use ALB ingress, the subnets will be tagged later in step 4. For the default VPC, all subnets are public.
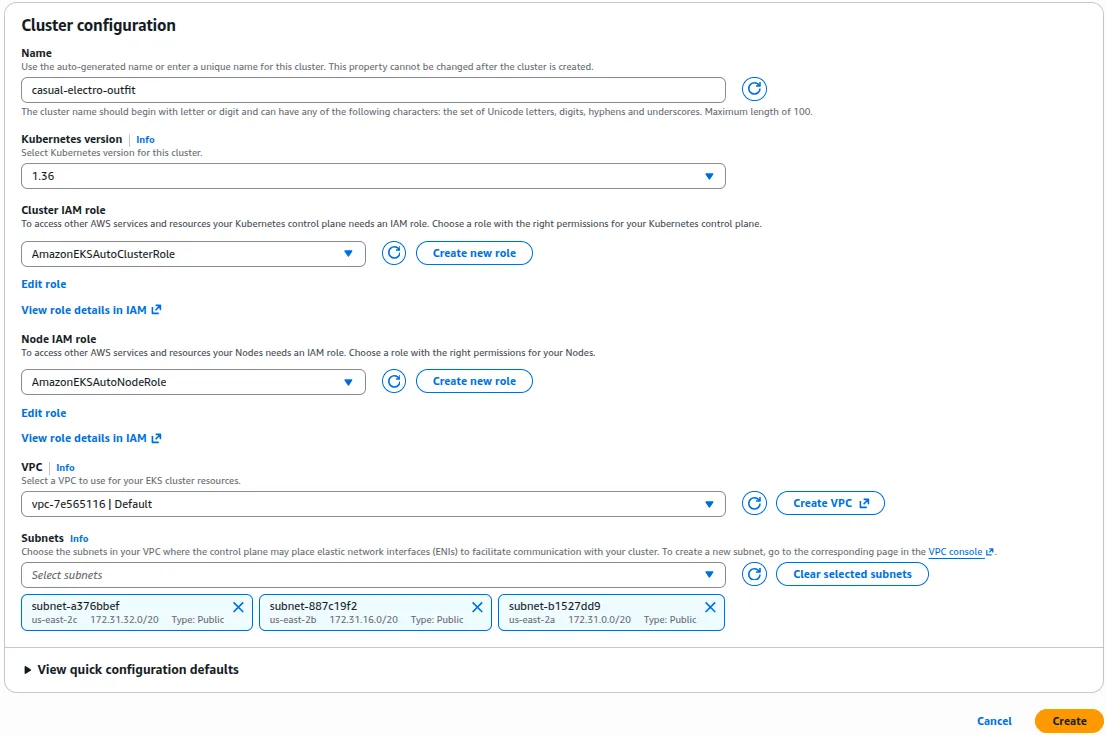
Cluster creation takes ~10–15 minutes.
2. Configure the cluster
Section titled “2. Configure the cluster”Once your cluster is active, configure it with AWS CloudShell or a local terminal.
Option 1: use CloudShell
CloudShell is the easiest way to interact with your new cluster. It’s a browser-based terminal built into the AWS console, already authenticated to your account session. Open it by clicking the small [ >_ ] icon or ( [ >_ ] Connect ) button in the top navigation bar.
With CloudShell, aws and kubectl are pre-installed. Install helm to your home directory so it persists across sessions:
mkdir -p ~/bin
curl https://raw.githubusercontent.com/helm/helm/main/scripts/get-helm-3 | HELM_INSTALL_DIR=$HOME/bin USE_SUDO=false bash
export PATH="$HOME/bin:$PATH"   # add this to ~/.bashrc to make it permanent
Configure kubectl against your new cluster:
aws eks update-kubeconfig --region <your-region> --name <your-cluster-name>Verify access:
kubectl get nodesIn Auto Mode, you will see nodes from the built-in system node pool that EKS provisions for cluster services. Workload nodes for query executor pods are provisioned on demand when queries arrive.
Option 2: use a local terminal
If you prefer a local terminal, install kubectl, helm, and the AWS CLI on your machine, then run the same update-kubeconfig commands to configure kubectl against your new cluster and verify access.
If you get a ResourceNotFoundException, confirm aws sts get-caller-identity shows the same account ID as the one in the top-right corner of the AWS console.
3. Verify node auto-provisioning
Section titled “3. Verify node auto-provisioning”EKS Auto Mode creates built-in NodePools for the cluster. Confirm they exist:
kubectl get nodepoolsYou should see system and general-purpose listed. These handle capacity for the Icebreaker Agent and Data Server pods. When you install Icebreaker, the Agent creates additional NodePools for each Capacity Policy.
In Auto Mode, Karpenter runs inside the AWS-managed control plane — there are no Karpenter pods in your cluster to check. The NodePool API being available is all the confirmation you need.
4. Prepare ALB ingress
Section titled “4. Prepare ALB ingress”Skip this section if you plan to use the nginx ingress mode.
With ALB ingress, each Data Server gets its own Application Load Balancer. When the ALB is ready, its ELB hostname becomes the Connection URL that SQL clients use to connect. Two pieces of configuration must be in place before the Icebreaker Agent can provision ALBs: subnet tags and an alb IngressClass.
Tag your public subnets
Section titled “Tag your public subnets”Auto Mode’s load balancer controller uses subnet tags to identify where to place ALBs. Public subnets need the tag kubernetes.io/role/elb: 1.
Option 1: AWS Console
Open your cluster in the EKS console and go to the Networking tab. The subnets associated with your cluster are listed and clickable. Open each public subnet and click the Tags tab. Add the tag kubernetes.io/role/elb with value 1.
Option 2: AWS CLI
Get the subnet IDs associated with your cluster:
aws eks describe-cluster --name <your-cluster-name> --query "cluster.resourcesVpcConfig.subnetIds" --output textThen tag your public subnets (for the default VPC, tag them all):
aws ec2 create-tags --resources <subnetA> <subnetB> <subnetC> --tags Key=kubernetes.io/role/elb,Value=1For a custom VPC with a mix of public and private subnets, tag only the public ones with kubernetes.io/role/elb: 1. See Tag subnets for EKS Auto Mode for private subnet tagging if you need internal load balancers.
Configure the ALB IngressClass
Section titled “Configure the ALB IngressClass”These two resources tell Auto Mode how to configure ALBs for your cluster. The Icebreaker Agent creates the per-Data-Server Ingress resources automatically once these are in place — you do not create those yourself.
Create a temporary file alb-ingressclassparams.yaml.
apiVersion: eks.amazonaws.com/v1kind: IngressClassParamsmetadata: name: albspec: scheme: internet-facingApply it:
kubectl apply -f alb-ingressclassparams.yamlCreate a temporary file alb-ingressclass.yaml:
apiVersion: networking.k8s.io/v1kind: IngressClassmetadata: name: alb annotations: ingressclass.kubernetes.io/is-default-class: "true"spec: controller: eks.amazonaws.com/alb parameters: apiGroup: eks.amazonaws.com kind: IngressClassParams name: albApply it:
kubectl apply -f alb-ingressclass.yaml5. Create the workload namespace
Section titled “5. Create the workload namespace”Create the eyrie-compute namespace that Icebreaker uses:
kubectl create namespace eyrie-compute6. Confirm the cluster is ready
Section titled “6. Confirm the cluster is ready”Run this check before moving on:
kubectl get nodepools
kubectl get ingressclass alb
kubectl get namespace eyrie-compute
You should see:
NodePools
systemandgeneral-purposelisted and Ready.IngressClass
albwith controllereks.amazonaws.com/alb. (Skip this check if you’re using nginx ingress — there will be noalbIngressClass.)Namespace
eyrie-computeinActivestatus.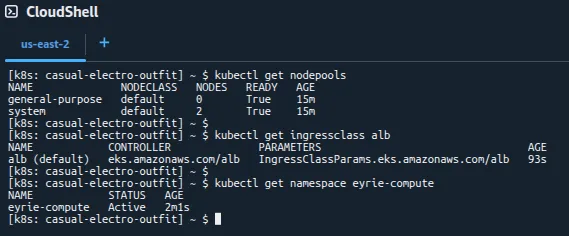
If all three pass, return to the prerequisites to complete the remaining setup steps.